Shoulda Coulda Woulda

A low of 30 forecast for tonight.  French string beans are already not pleased/half dead.  Could have put some floating row cover down to up their chances of survival, regardless, I planted them too early.  Will have to review my notes to see what drove me to put them in the ground in early April.  Peas on the other hand are loving it.

Read more...

Crawl, Walk, Run


Rain coming this weekend.  Wanted to get some grass clippings into some back field beds ahead of it so they'd have time to decompose before the pepper and tomato transplants go in.  Kristie was there to help me, praise be to allah, and the final bed forming was done with a rake.  That is not the ideal method.  There are things you can drag behind your tractor that do that for you.  I do not have one of those things.  Yet.  I figure I'll bathe in the suck this first year and if things go well I can start adding to the 'labor saving' devices as we expand.

Read more...

Antithesis of Smarter-Not-Harder

I'm trying to get some green mulch down on the recently planted beds to reduce watering requirements, add organic matter back into the soil, and get some nutrients to the plants that are being grown in those beds.


This is why I am pushing a leeeetle bitty lawnmower in a really big pasture, dumping the clippings into the metal box on the front of the tractor and driving that box to the field with the crops in it and spreading the clippings as mulch. Normal people/farmers employ 4-legged grass-mowers (cattle, goats, sheep etc...) and get the added benefits of manure to add to soil and compost piles and tasty treats when the animals get big enough. I do not. I am trying to 'adapt and overcome' with the 'tools I have, not the tools I wish I had.' And that is why I must look like a psychopath to any neighbors as I push a lil' Torro Lawnmower around a 10-acre field emptying the bag on every pass. Good times.
Little Bit Done
Whooole Lot To Go

Read more...

Drop in the ocean.

It cuts the grass and empties the lawnmower bag into the big metal box. It does this until the big metal box is full of grass clippings (about 1/2 cubic yard).  It uses the tractor to move the big metal box to the crop area where it spreads the grass clippings onto the rows as mulch.  It repeats this until all rows are mulched.  It does this or it gets the hose.

Read more...

Seed Starting Exposé!! Part II Germination

In lieu of "Tool of the Week Sunday" here's Part II of the Seed Starting Exposé where we cover how to take a packet of seeds from in-the-packet to in-the-ground. In Part I we looked at storing and testing the seeds to ensure you even have a fighting chance to make it to sprouts. Today we'll cover how to make it from seed to germination. I'll show you two ways too. The first will be how you can/should do it at home and the second will be the method we are using here on the farm, the only real difference is scale, governing principals remain the same.

Seed Starting Tray
Supplies: One packet of seeds requiring transplanting (some plants like peas, beans, radishes etc... should be directly sown and starting indoors is not recommended) , a ready made  'Seed Starter Tray' (else you'll need seed starting mix, styrofoam cups with drainage holes poked in the bottom, and a plastic tray to keep them in), a roll of plastic wrap, a spray bottle filled with water, a knife with a pointy tip, and a place with a steady 70-80F temperature range.

Task: Create the conditions required to germinate 1-2 seeds per cell in preparation for transplanting into soil or larger pots.

Those conditions are basically: soil to seed contact at the proper depth underneath the surface, consistent moisture levels, consistent temperature in the range required for that seeds germination (will be listed on the back of the seed packet, barring that most will germ between 70-80F).

Endstate: Achieve 50% or greater germination rate and begin preparations for hardening off (hardening off is the 'hard part' (get it? hard?) and is most likely the place you could potentially kill off the whole tray off, but we'll cover it in part III)

Step 1: Open up the package, the actual soil should be contained in a thin plastic film of cells that are sitting in the more rigid bottom tray. If this is not the case you're going to need to find a tray to put your cells into, one that won't drain. Pour some room temperature water into the tray (1/4 full) and put the sheet with the cells into it to begin soaking up the water from the bottom.

Step 2: Take your seed packet and look on the back for the 'suggested planting depth' (if you're using your Uncle Ebeneezer's heirloom seeds and have no packet, a good rule of thumb is plant the seeds at a depth 3x the seeds width). Using your knife, scratch two holes in each cell at the depth called for on the seed packet.

No more than 2 seeds per cell
Step 3: Open your seed package and pour out as many seeds as you have cells and place two seeds into each cell, one in each corner about 1/4" from the actual corner. Some seeds are friggin microscopic and when you have big ole hands like me manipulating individual seeds can be a challenge. This is where the knife with the pointy tip comes in. Just use the tip of the knife to scoop up 1-2 seeds from your hand and dump them into the trench. You don't want to put more than 2 seeds into a cell because eventually you're going to have to thin them to just one plant per cell and having to thin 23 seedlings from a single cell drastically increases the chance that you're going to cut them all down or at least nick/disturb the one seedling you wanted to keep.

Step 4: Using the knife, scrape soil over the seeds filling the trench and firm the soil on the surface of the cell with the butt of the knife remember one of the key ingredients for success is proper seed to soil contact. You want it firm but not packed down so water can't drain or the young roots can't drop.

Step 5: Move the tray to the sink or somewhere where you can spray your water bottle and mist the tray until each cell is thoroughly soaked.


Step 6: Take and cover the top of the tray with plastic wrap and move to the warm, temperature stable environment. Bonus points if the heat source is directly below the trays providing 'bottom heat.'

Step 7: Check on your tray at least once a day ensuring that the cells still exhibit signs some of moisture and aren't bone dry like in the picture above. If they are, re-mist them and check to make sure the plastic wrap is tight and keeping the moisture in the cells.


Wet


Dry
That should do it!  Remember, your mission during this phase is to provide: Seed-To-Soil Contact, Moisture, and warm temperatures, your reward will be a tray full of sprouts ready to complete their preparations for entry out into the real world. We'll cover those preparations in Part III 'Sprout to Hardening Off'.

Here are the 'economies of scale' tweaks to the 7 Step Method we use here at Serenity Valley Farm just to share with you how we do it here for 'small scale production.'


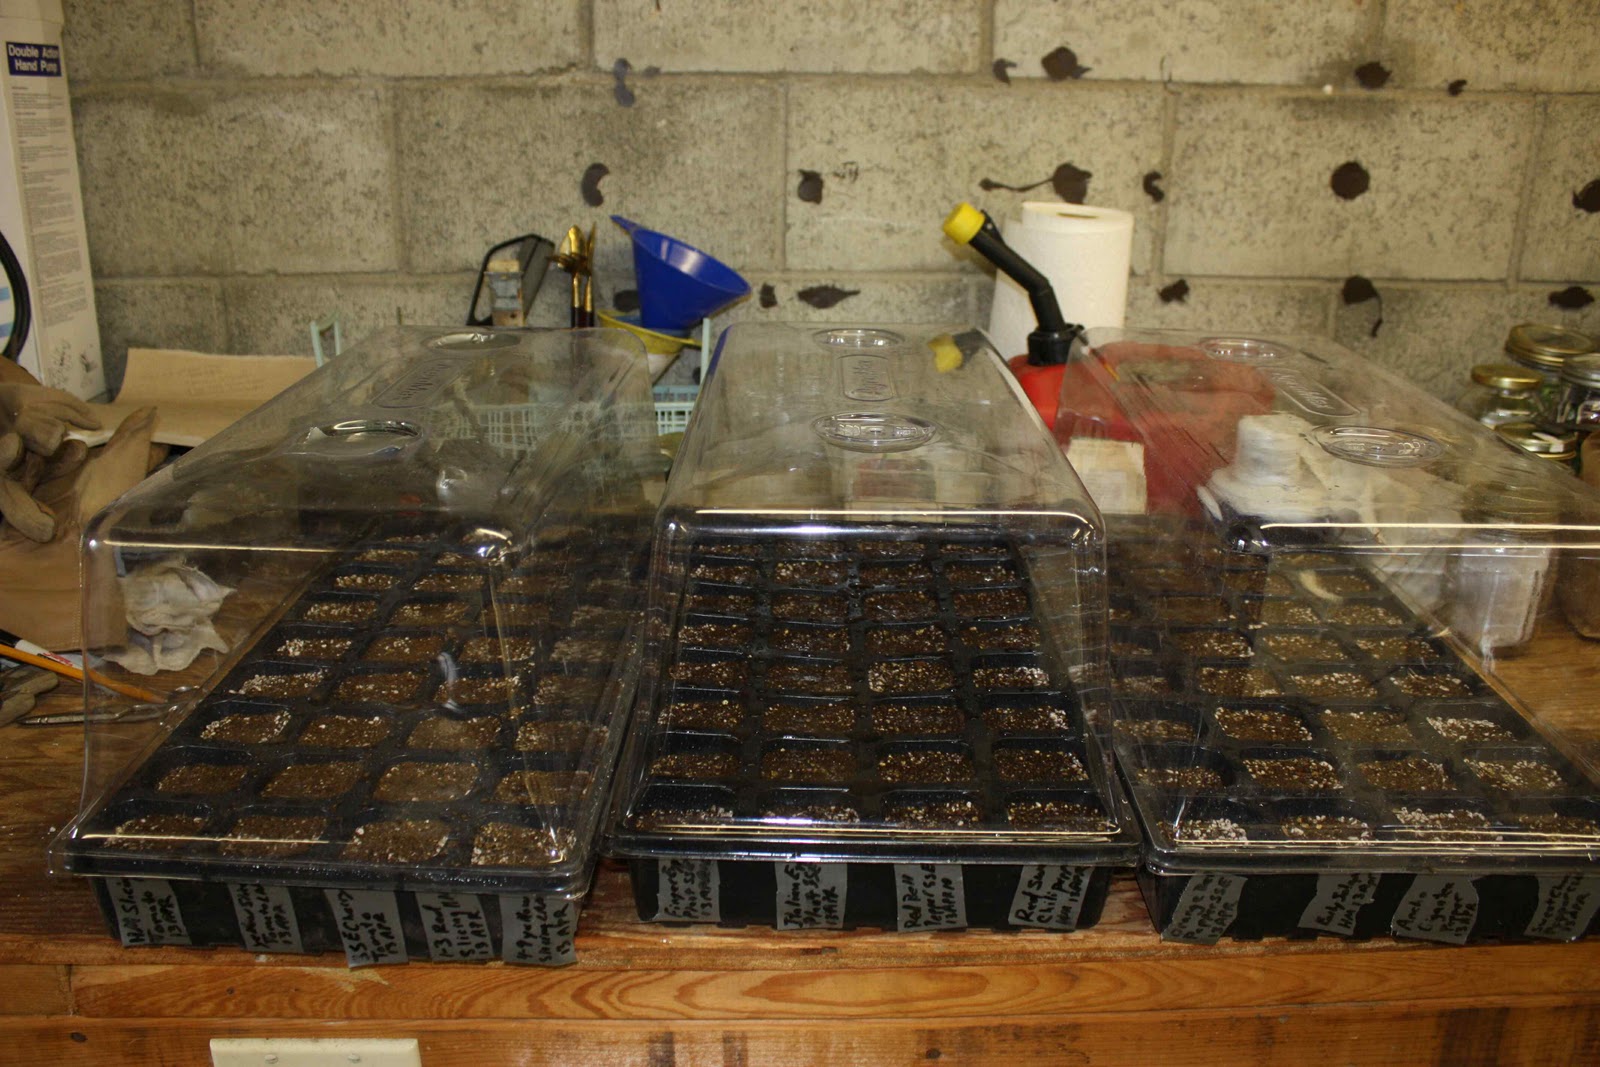
1. Instead of the plastic-wrapped seed starting tray we purchase flats of 'Jiffy Plugs' in bulk. These are compressed peat plugs that are made in a variety of widths depending on what type of seeds you are starting and how long you'll need to keep them in the plugs before transplanting. Larger plugs will allow you more time before the roots of the seedlings outgrow the plug and demand transplanting. These flats of plugs, which are disposable, are placed into 10"x20" nursery flats (w/no drainage holes).


Each flat contains 75 cells and serves the same purpose as the seed starting tray. We use rigid clear plastic propagation domes with adjustable vent holes on the top to serve the same purpose as the plastic wrap. They provide better moisture retention and allow us to keep the trays in the germ chamber longer to get a better start on vegetative growth which increases their chances as they enter the hardening-off phase.

Prop. Domes


Our Germination chamber is just a metal cargo bin with a piece of plywood on it with a vent hole cut in it and a 400W metal halide shop light above it. By manipulating the vent hole we can keep the temp between 80-85F.
Germination Chamber

Vent Hole

Warm-N-Happy
List of heirloom seeds we currently have in Germ Chambers (that's right, heirlooms, hybrids are for sissies, though most Agricultural Extension Agents will tell you to stick to the hybrids when you're first starting out cause "you'll need all the help you can get." I'll let you know how ignoring that advice works out for me.):

Orange Bell Peppers
Early Jalapenos
Ancho Giganta Peppers
Sweet Chocolate Peppers
Fingerling Eggplants
Italian Eggplants
Red Bell Peppers
Red Sweet Chili
Crimson Sprinter Slicing Tomato, a yellow slicing tomato that the neighbors gave us when we moved up here Riesentraube Cherry tomatoes
Greek Oregano
Common Thyme
Flat Leaf Parsley
Italian Curled Parsley
Rosemary
Catnip
Chives
Sage

It's about time to start thinking about starting some early cucumbers too. Y'all have a nice week and thanks for reading.

Read more...

Frakking SLEET!?!?!

So it spent the majority of the day sleeting after a good rain yesterday. I'm sure the seedlings are just thrilled that I decided not to deploy the row covers as they are mostly 'cool weather' plants (like lettuce, peas, beans, etc...).  We'll see next week if any of them got pissed at me enough to die off. Started some flats of Sage, Rosemary, Catnip and Thyme and put them into the germination chamber, theoretically will see them sprout around the first of May then into a vegetation chamber before being hardened off and planted into soil. More on what all those terms mean in the next installment of the "Seed Starting Series" but now it is time for a beer and some Xbox.

Read more...

Smarter-Not-Harder Tip# 779 Breaking new ground

Given one 29HP tractor with a 'middle-buster' (it's like a mini one-blade plow) and a 5' rear scraper-blade and a walk behind roto-tiller, what is the better method of breaking new, never ever before plowed hilly somewhat rocky ground with ~3" of grass on it?

Is it:
A. Pass the roto-tiller over the packed ground 23 cajillion times trying to lower the depth the blades are digging in a bit on each pass but acting confused when all you do is create a 3" mat of tore up grass on top of the hard top soil.

OR

B. With the 'Mini-plow', rip as many side-by-side trenches as you want the bed to be wide, plus one more The extra one will be the uphilliest one and will be used to catch and store water and you can fill it with grass clippings, pulled weeds, etc... to create a mini-compost pile that runs along the uphill edge of your bed so all the nutrient goodness will seep into the soil and downhill a bit and give your plants some extra nutrients. Place the furrows as close as you can get them w/out rolling the tractor, along the contour of the hill. Then take the roto-tiller and starting with the second most uphill trench, place the tiller's uphill tire into that trench and run the length of the bed carving the trenches down and clearing rocks. The first 3 passes will be the hardest. Then take the scraper blade on the tractor and run the bed leveling it out, then roto-till again (you're at about 6 passes now, per row, per bed, it's not as fun as it sounds). Wait for a rain to come and soak it all in before a final tilling a few weeks before planting.

I'll give you a hint, it's B.  Ask me how I know :-)

Read more...

Meet the Team: Flash

NEW FEATURE!!! Every now and again we'll drop a little profile piece on a member of the Serenity Valley Farm Team. Today, I'll introduce you to Flash. As you can see from the below picture, Flash is a tool of terror and destruction. He (and his brutha from anutha mutha Streak) were rescued from a family who already had a large number of pets and could not keep up with the energy levels these two hellcats displayed. We got them both in early March and kept them inside the house with us because they were too young and it was too cold for them to make it outside. After 2 weeks, these cats were such little balls of terror that watching them could only be described as babysitting two 3-year old boys hopped up on cocaine. When it was warm enough, they were more than happy to be moved out to their new place of business, the barn. Their mission is to deny rodents any sanctuary in the barn and disrupt rodent operations in surrounding fields. Apparently this job is incredibly exhausting as Flash here is racked the hell out at like 10AM. Hopefully it's cause he was up all night chasing voles and not cause he drank all my Shiners.

Read more...

Seed Starting Exposé!! Part I

It's spring. You have that packet of 'homemade heirloom tomato seeds' your Uncle Ebeneezer gave you for Christmas, you figure you oughta grow them (ProTip #239: Most seeds can/should be stored in an environment where "temp in degrees" + "rel. humidity in %" < 100, if you exceed those figures, say by storing them in an area where the temp. is 70F and the humidity is 40%, then you are degrading the "Germination Rate" or the % of seeds that will sprout when you put them in the ground) but you could use a few lil tips on seed starting.

This multi-part exposé on the secret world of 'Prop. Domes', 'Germ. rates', 'hot houses,' 'cold frames,' and 'hardening off' will help you get your seeds off to a strong start.

Propagation Domes
So, as mentioned above, you've been storing your seeds in a cold, dry, place for the last few months. If your Uncle Ebeneezer is of suspect character and you fear he might have given you some bum seeds in a diabolical attempt to destroy you, you can perform what is called a "Germination (Germ) Test" to determine what if any percentage of the seeds you put into the ground will actually come up.

Simply take 10 of the seeds, put them onto a paper towel, spritz them with some water, fold the paper towel over onto itself numerous times and moisten the paper towel to 'damp sponge' level then put the paper towel into a Ziploc bag, seal it, and place it in a warm place in your house (above the refrigerator is the old cliché place.)  Look up the 'days to germination' listed on the seed packet or online, and after the # of days +/- 1-2 days, open up the bag and see how many of the seeds sprouted. 7 out of 10 did? Your 'germination rate' is 70% meaning for every 100 seeds you plant in the field, you can expect 70 to sprout. Basically it's just a viability test to ensure that the seeds you are relying on are still good. In this economic environment where quality seed can be sparse and popular varieties can sell out months before the growing season, it would suck to be relying on your stash of 'super duper beet seeds' from 2005 to fulfill your beet needs for the upcoming 2011 season, plant them in the fields and have none of them come up then go to order more online and find out that 'super duper beet' seeds have been sold out for 3 months. FOILED!

What the little exercise above indicates is that for a seed to sprout, it needs, at a minimum, 3 things: X amount of moisture, X amount of thermal units, and seed to soil contact at a depth under the soil surface specified for that seed. Every seed has contained in it the energy required to sprout, drop a 'tap root' (basically a baby root system), push up a sprout, and develop its first set of 'true leaves.' After that it relies on the soil, water and photosynthesis for further growth.

Your mission when starting your own seeds for transplant is to supply the required environmental conditions needed to get the seeds into the 'vegetative growth stage' (the stages are basically: 1.Seed 2.Germination/sprouting 3.Vegetative Growth 4.Flowering 5. Fruiting).

So, to review, we've covered the basics of seed sprouting and how to make sure your seeds actually 'work,' or stage 1 of the 5 above.

In Part II we'll cover how to get through Stage 2--Germination.

Read more...

Chock Full o' Eggs

We have a lot of eggs. Our 20 or so hens are popping out those babies like nobody's business. We hope to start selling them soon, but for now, we're just trying to eat them in as many ways as possible - traditional scrambled, breakfast tacos, walnut tortes, egg salad sandwiches, potato & egg tarts and casseroles. The egg casserole is one of my favorite ways because you can make it different every time based on what's in your fridge and pantry. I recently wrote up my recipe for my version of the Versatile Egg Casserole.

If you're interested in buying our eggs, shoot us an email at serenityvalleyfarm (at) gmail.com and we'll let you know when we're ready.

Have a favorite way to use eggs? Leave us a comment and tell us about it!

Read more...

Cutest Field Hand EVAR!!!


Her royal cuteness planting onion sets.

Read more...

Ready to Rock(phosphate)-N-Roll

Welp, Mr.FedEx man arrived today with the rock phosphate, floating row cover, and black plastic mulch (shown from left to right). My soil test results called for 255 pounds of phosphate per acre in most fields.  That is a crap ton of phosphate. I ordered 150 lbs and since I'm "strip farming" (where you take a field and only prepare the actual strips you're going to be planting in, also called 'contour farming') I figure I can selectively apply it to the rows that require the most phosphate (root crops like beets and carrots) now and till it in to the other rows during field prep for later season stuff like corn, tomatoes, and peppers. This soil has a LOOOOONG way to go before it will be "average vegetable growing soil". Fun Fact: It takes approx. 4-5 years to build soil from "never before used for farming" to "self-sustaining soil that doesn't require constant additions of fertilizers and amendments."


P.S. I know this is a long shot, but can ANYONE guide me to a local (Pittsburgh) provider of bulk organic fertilizers and agricultural supplies? I've asked a bunch of people and searched online and found nothing.

Read more...

Tool of the Week-Carpenter's Square

Okay, NEW FEATURE!!!  Gonna try and do a "Tool of the Week" feature on Sundays that highlights a tool or implement that makes my life easier cause let's face it, there's a lotta schlock out there designed to take your monies and trick you into thinking said 'tool' will save you time/effort.  It'll go along with the "Smarter Not Harder" series as well, this week I'd like to cover the Carpenter's Square.


Bottom Line Up Front (BLUF): If you are building it, and it is made of wood, and involves 2 or more pieces of wood, you need this tool.

If what you are building is going to bear ANY sort of load then you REALLY need this tool.  What it does is aid you in verifying that the two pieces of wood that you are joining are 'square' or truly perpendicular.

Let's look at it this way, let's say you wanna build a square out of 2x4s that you can stand on. Without the square, you are 'assuming' that the vertical legs of the square are perpendicular to the horizontal legs of the square. If you are wrong in your assumption, when you stand on top of the square you are relying, to some degree, on the screws/nails/glue that you used to join the wood to bear your weight.  

If you had used the square and verified that the vert. supports were square to the horizontal supports, then the vertical supports would have been bearing your weight as you stood on the top horizontal support and you would have been happy instead of lying twisted and broken at the bottom of a pile of collapsed 2x4s because you thought you had a 'calibrated eyeball' and your wife wouldn't be on the phone to the ER and your kids wouldn't be going "mama! mama! why is paw bleeding profusely and cursing the demon gods of gravity and Darwin?"


Read more...

Jamie Oliver's Food Revolution


There's not too many people on the planet I'd say that I admire, Jamie Oliver is one of those people. If a nation, not my own, wants to kill themselves eating pizza made from chemical-soaked, processed ingredients for breakfast, lunch and dinner, well that's between them and Darwin. Jamie not only put a stop to it in the UK, he's come over here to try and help our kids have a fighting chance. Peronally, I find it incredibly embarrassing that a Brit has to come here and ask us to stop killing our kids, but I respect the drive that led him to do it.

If you've got a spare moment, please drop by Jamie Oliver's site and sign his petition, I'll let him explain what it's about:
The American Food Revolution needs to start now! If you care about your country and the health of its children please help us make a difference. We need your support to get people back in touch with food and keep cooking skills alive before it's too late. We want to make sure every kid gets good, fresh food at school. It's proven that real food promotes more effective learning. If you want better health for your kids the junk food must go. I need to be able to show The President and industry how many of you out there really care about this issue so please don't wait, sign up today. It will only take 30 seconds.
 If you haven't watched the show, I'd highly recommend it. Episode 4 airs tonight at 9/8c, 1-3 is available online at Hulu.com.

Read more...

Aaaarrrrrgggggghhhh!!!!!!!!

So, back on March 5th, I put in an order with a company called Agriculture Solutions LLC for floating row cover, black plastic mulch, and most importantly, rock phosphate.  In addition to being called for by soil test results, phosphate is one of the most important components for root veggies like beets, radishes, carrots etc...  The company has yet to deliver the products citing multiple delays by the row cover manufacturer.  I did just get a tracking number saying all items have shipped and are due on 12APR10 which is about 3 weeks PAST when I should have had the first beets in the ground.  Lesson learned, try and find a local supplier of key/critical components to use as a backup for when online suppliers (which are usually cheaper) fall through.

Read more...

Serenity Valley Farm: 1 Ground Hogs: 0

What follows is a dramatization of an event that occurred on 05 APR 10 at approx. 1700hrs told all military like, so don't be irked if what follows doesn't make sense to everyone.

[Scene: Brett (RedMoon06) and Dora the Dog (RedMoonDelta) are on patrol vicinity of field 503]

(radio squelches)

"RM06 this is RM Delta, I'm picking up some signs of recent enemy activity south side of 503, moving to investigate, time now, over."

"RMDelta this is 06, roger, charlie mike I have you in overwatch from 501. 06 out."

"06 THIS IS DELTA! CONTACT! CONTACT CONTACT! AM IN HIGH SPEED PURSUIT OF ENEMY GROUNDHOG TOWARDS SOUTHERN BOUNDARY OF 503, BREAK...06 this is Delta, I have  1 enemy groundhog pinned in a tree at my location. Please advise. Over."

"Delta this is 06, moving to your location time now standby. 06 out."
(RM 06 switches from internal patrol freq. to RedMoon command freq.)

"Red Moon TOC (Tactical Operations Center, or 'Base') this is RedMoon06, SALUTE report to follow, over."

"RedMoon06, this is RedMoon TOC, send it, over."

"RM TOC, this is 06. SIZE: 1 adult ground hog ACTIVITY: holding a defensive position in a tree LOCATION: south side of field 503 UNIFORM: grey fur TIME: 1754hrs EQUIPMENT: none.  Request permission to engage. Over."

"RM06, this is RM TOC, standby, gotta check with JAG. Over"

"RM TOC, RM06 roger, standing by"

"RM06, RM TOC JAG says use of lethal force is authorized, you are cleared hot."

"RM TOC, RM 06, engaging, with...RADIO SQUELCH AND STATIC...."

"RM 06, RM TOC.  You're breaking up, what's your status? over."

"RM TOC, RM 06, 1xEKIA (Enemy KIA) and NIDE (No injuries or damaged friendly equipment) we are RTB (returning to base) time now. Over."

"RM06, RM TOC. Roger. Good kill. Out."

Read more...

Who's a Happy Farmer?

Read more...

Breaking Up (Ground) Is Hard To Do

We now have approx. 8% of the rows set aside for 2010 prepared to the point they have seed in them. Our in ground crops germinating include: string beans, snow peas, lettuce, snap peas, soy beans, swiss chard, pak choy, and spinach.  Tomorrow, gonna go try and score the biggest watering can EVAR!!!  Will let y'all know how it goes.

Read more...

One by One

Smack dab in the middle of planting.  So far we are complete on getting the snow peas, green peas, and soy beans into the ground. Here's a lil' story. I've allocated approx. 5,200 row feet for this year, broken up into 52 100' rows.

Pro-Tip: One normal size seed package of Soy beans contains about 50 seeds.  So...uh....at the recommended seed spacing of  1 per 4" that's, well it's about 20 feet.  That's 0.01% of our available row space.  Kinna a little less than I'd imagined.  So, I reckon I'll just let all glorious 20' of them go to seed so that next year I can plant FORTY FEET of SOY BEANS and then the NEXT year I can plant EIGHTY FEET of soy beans and THEN in year 4 I'll get to plant a whole row of soy beans.  Lesson learned:  buy your soy bean seed by the 1/2 pound unless you're growing on an apartment balcony.

Read more...

Castle "Stay the Hell Away From My Hops Mr. Rabbit and Deer"-enstein

We've had our first plants sprout from the ground -- 2 of the 5 varieties of hops planted from rhizomes on 15 MAR 10 (Nugget and Centennial) have already sprouted. They're in field 502, along the fence line, once mature, they will reach to a height of over 20' (only 6' in the first year). They were placed in this location to receive the brunt of the drying winds that sweep through.


In order to protect the hops from the wandering mouths of rabbits and deer I fortified them with a little fence of chicken wire with a prickly piece of evergreen on top, like their own lil protective forts.


Looking to plant spinach and some lettuce in field 501 tomorrow, this soil is ready to plant in right?  RIGHT?!?!?

Read more...

Labels

497 (2) agriculture solutions llc (1) agronomics (1) Ancho Poblano Peppers (1) apples (1) bamboo (1) barn cat (1) basil (1) beans (1) beans pics (1) bee keeping (1) bees (1) Benchmade (1) benchmade 806D2 (1) bio-char production (1) Blawnox (2) bok choi pics (1) bolting (1) Butternut Squash (1) chicken arc (1) chickens (4) chocolate zucchini cookies (1) chocolate zucchini muffins (1) cilantro (1) combat knife (1) compost (1) compost extract (1) compost tea (3) construction junction (1) contour farming (1) cover crops (1) cows (1) crockpot recipes (1) crop layout (2) crop plan (2) crop planning (4) dill (1) dora (1) Early Jalapeno Pepper (1) Echo SRM-230 review (1) Egg casserole (1) egg problems (1) eggmobile (1) eggplant (1) eggs (2) electric fencning (1) Farm family (1) farm irrigation (1) farm layout (3) farm overview (2) farm photos (1) farm stand (12) farm supplies (2) farmer grants (1) farmer veterans (1) farmer-veteran coalition (1) farmers market nutrition program (1) FAV-29 (1) fertilizer (1) field 502 (2) Field Day 2011 (1) field prep (5) field status (1) flash (1) food revolution (1) food systems (1) fruit trees (2) garlic (1) garlic planting (1) garlic scapes (1) green compost (1) green garlic (1) green manure (1) greens (1) ground hogs (1) growing peas in PA (1) hairy vetch (1) Happy New Year (1) heatwave in PA (1) heirloom melons (1) herb seedlings (1) homemade applesauce (1) homemade yeast (1) hops (2) hops in PA (2) how put down black plastic mulch (1) how to keep basil fresh (1) how to plant seedlings (1) humane chicken processing (1) Jamie Oliver (1) kale (1) Kale Recipes (1) Kubota (1) Kubota B2920 won't start (1) last average frost date western PA (1) legume plan (1) Listada de Gandia eggplant (1) local food movement (1) making yeast for bread (1) Meet the team (2) mint (1) moon and stars melon (3) mushrooms (1) naming conventions (1) new website (1) news (1) oats pics (1) Off-season (1) onion pics (1) online farm products (1) organic (1) organic fertilizers (1) paddock shift (1) perma-culture (1) Pingtung Long Eggplant (1) planting (3) plastic mulch (1) Polyface Farm (1) poultry netting (1) press release (1) Pro-Tips (5) produce handling (1) rainbow chard (1) Raw Kale Salad (1) recipes (6) red moon (1) rye (1) Ryobi Xpand-It (1) Sage seedlings (1) saving watermelon seeds (1) seed ordering (1) Seed plan (2) seed saving (1) seed starting (2) skunk (1) smarter not harder (5) soft shelled eggs (1) soil nutrients (1) soy beans (1) straight shaft trimmers (1) strip farming (1) swales (1) swiss chard (1) thai chili (1) Thanksgiving (1) Tool of the week (2) top bar bee hive (2) tractor safety (1) USDA FMNP (1) utility knife (1) watermelons (1) western PA drought (1) what do skunks eat (1) Worshops (1) yellow tomatoYellY (1) Zucchini (1)

  © Blogger template Shush by Ourblogtemplates.com 2009

Back to TOP